First, you will need to get the ingrediants in order to make Jello. This is quite simple. Jello packets (flavor varies depending on taste :)) and water. Now that you have the ingrediants, boil water according to the directions on the box of the Jello.
Once you have done this, get a mixing bowl and put the contents of the jello packet in it. Put the water in the bowl and use a wooden spoon to mix it all together. Do this till the Jello powder has completely dissolved. Once you have done this put into individual serving glasses for whoever you want to give it to!
Congrats! You just made youself Jello! Now to add flavor to the Jello you can add cool whip! It makes the Jello delicious and pretty!
Monday, February 14, 2011
How To Find Something You Lost
Ever lose something and can't remember where you put it? Like a cell phone or keys? Well here somes ideas on how to find it again.
First, Check your immediate surroundings. Survey the room or rooms where the item might be. Don't go into depth, searching under a pile of clothes and inside pants' pockets. Instead, just look around to see if the item is in plain sight. Also, Look for the missing object where it's supposed to be, or where it can usually be found. If you lost your check card, then you should obviously check your wallet. If your keys are missing, then look in your door and car locks to make sure you didn't simply forget them. Sometimes things are just where you left them.
If you still can't find it after you did the others, then Search for the missing object in depth. If you have a messy residence, this may require some time. Make sure to be thorough. Most people have the same daily routine, which will narrow things down a bit. Eliminate places that the item is very unlikely to be (such as keys in the oven) to save time. You probably thought of several possible places, gave a cursory check of the first few, and by the time you got to the end of your list were getting worried and looking more carefully. Go back and look carefully in those more likely places too.
Still can't find it? Think back to the last time and place you used the missing object. Did you take it to work or to a friend's house? Were you recently at a restaurant or on the city bus? When did you use the object last? Retracing your steps may lead to the object. These things usually happen when we are on auto-pilot and get distracted. Maybe someone was cleaning up and moved your item. Where might they have put it?
If still lost, consider getting a new one or replica of keys. If not too important, give it time. A lot of the time your missing objects will randomly show up.
Tuesday, February 8, 2011
How To Make a Starburst Bracelet!

Ever wondered what to do with the wrapper once you finished your candy? Why not make a bracelet! Here's a how to that will show you how to be cute and creative!
Step 1: Start with a wrapper and try to smooth it out if it has any creases

Step 2: Flip the wrapper so the color is facing down

Step 3: Fold the outer edges in to meet in the middle
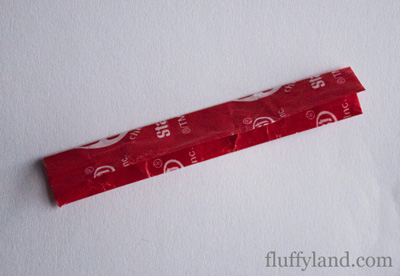
Step 4: Then fold the wrapper in half
Step 5: Fold the wrapper in half again
Step 6: Then fold the wrapper in half so the edges meet
Step 7: Fold one side to the halfway point.
Step 8: Repeat 1-7 with a new wrapper
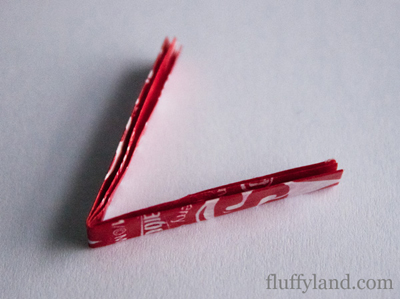
 Step 9: Insert points 1 and 2 into slots A and B, so it looks like the picture above.
 Step 10: Continue steps 1-9
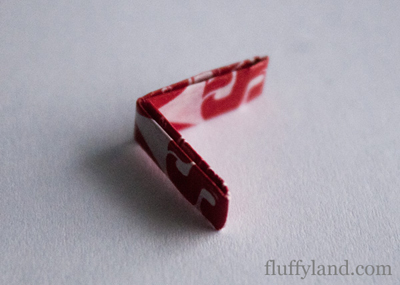
 Step 11: Do step 10 till you get a chain like the picture above.

Step 12: Once you have reached the desired length, then you end it. To end it
fold one more wrapper the same way as the others, but then unfold the last two folds. Insert these raw edges into the same spots in the “V”. Pull the two ends of the bracelet close together, and hold the edges of your long “V” over both edges of the end of the other side.Insert the raw edges into the first wrapper. You’re doing the same thing we’ve been doing, but backwards.Tuck the raw edges into the previous wrapper, so it looks just like the other wrappers in the chain.
If done correctly, you are done! You now have yourself a cute bracelet!
Sources: I got the pictures from http://fluffyland.com/blog/index.php/starburst-wrapper-bracelet-tutorial/
Subscribe to:
Comments (Atom)